The BFF Valentine Card is my featured Just in CASE this week. CASE stands for Copy and Selective Edit. You can copy it exactly, or edit it by changing the colors or the stamp set or both. My goal is to share how when you are in a stamping block you can be inspired by someone else.

In this post I will share with you why I CASE and what is expected if you do CASE. First I CASE to share with you how to CASE. Another reason I do is when I have hit a stampers block. Yes it happens to the best of us. We need a card and sit down and stare at the desk wondering where to start. Well CASEing is the best solution when you hit this wall.
When you do CASE and share your card on a public forum you want to be sure to give credit to the original stamper.
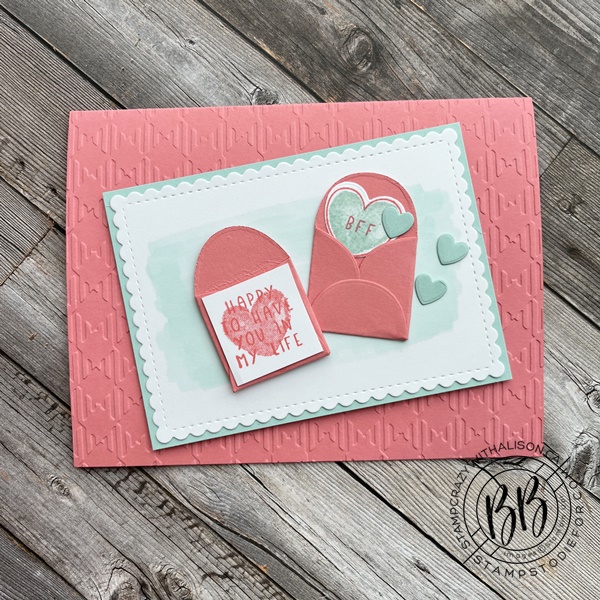
You can see in the sample that this is basically an exact CASE except for two things.
- The card base color Blushing Bride I substituted Flirty Flaming (I am a more bright and bold girl).
- The ink pattern on the card front, you can achieve by inking the raised part on the the embossing folder before running the cardstock through the Stampin’ Cut & Emboss Machine.
case bff valentine card
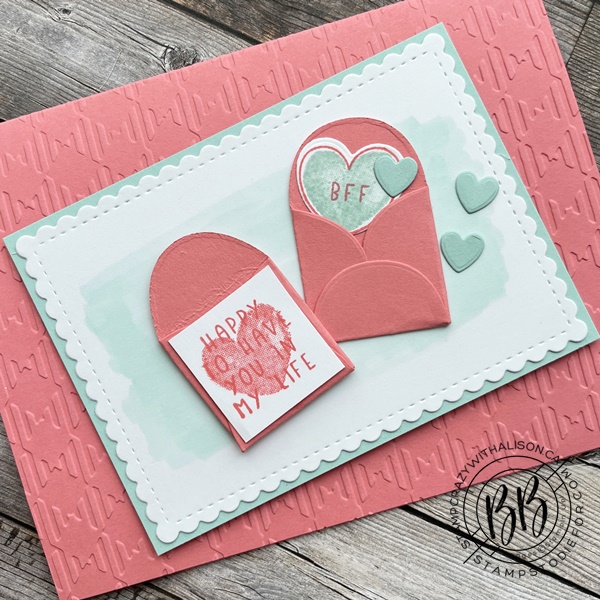
In addition to the embossing technique they did the watercolor wash technique. Using the brush tip of the Pool Party Stampin’ Blends Light (154894) and simply going from one side to the other on the Basic White achieves this great background.
simple stamping steps and measurments
MEASUREMENTS
- 141416 Flirty Flamingo (cardbase): 5 ½” x 8 ½” scored at 4 1/4″
- 141416 Flirty Flamingo (envelopes): 2 @ 3” x 3”
- 159276 Basic White (scallop rectangle): 3 ¼” x 4 ¼”
- 159276 Basic White (words): 1 1/8” x 1 1/8”, Heart 1 ½” x 1 ½”
- 122924 Pool Party Cardstock (mat) 3” x 4 ¼” and scraps for the hearts
- 157627 Gingham Embossing Folder
STAMPING STEPS
- Fold the card base in half on the score mark.
- Run the card front through the Stampin’ Cut & Emboss Machine using the Gingham Embossing Folder (157894).
- Cut out the Basic White using the rectangle from the Stitched So Sweetly Dies (151690);
- Color the Basic White scalloped rectangle as mentioned in previous paragraph and glue to the Pool Party Mat.
- Adhere the mat to the card front at an angle with Stampin’ Dimensionals.
- Cut out two envelopes (Sweet Heart Dies 157623) and fold the sides in and then the bottoms and glue.
- Glue the right one to the Basic White and the left with Stampin’ Dimensionals.
- Stamp the heart and words in Flirty Flamingo Ink on the Basic White and glue to the left envelope.
- Stamp the another heart in Pool Party and the words in Flirty Flamingo and cut out with the coordinating die, then tuck it in the right envelope.
- Cut out three small hearts in pool party ink using the dies and adhere randomly as shown in image.
Be sure and pop over to Alison’s blog and see what she has been stamping!
I hope you found some inspiration here today. Want More?
Sign Up for our E-Newsletters!
- Patsy’s E- Newsletter (US Customers)
- Alison’s E-Newsletter (Canadian Customers)
Would Love to have you shop with us!
- Patsy’s Online Store (US customers)
- Alison’s Online Store(Canadian customers)
Thanks for visiting my blog today! Happy Stamping!
Current Host Code 7GTTFTZW


Beautiful card! Love the bright bold colors you used.
Thanks so much